Posted on

Tapa Cloth: How to use authentic Tongan tapa cloth.

When it comes to creating a captivating Tiki Bar atmosphere, it’s all about the details. From bamboo accents to tiki´s, every element plays a crucial role in transporting guests to a tropical oasis. One such element that can infuse authenticity and cultural richness into your space is Tapa Cloth.

Tapa Cloth, also known as tapa or ngatu, is a traditional Polynesian textile made from the inner bark of certain trees, such as the paper mulberry, it is softened and pounded into sheets of cloth, then bound together using natural starches such as root crop. The tapa making tradition is found all across Oceania, but due to the labour-intense nature of its production, the craft has largely ceased in many countries. Tonga, a Polynesian kingdom in the South Pacific, boasts a rich heritage of tapa cloth production, with designs often reflecting intricate patterns and symbolic motifs.

Tapa cloth can simply be used as a decorative accent throughout your Tiki Bar. You can drape it over bamboo or rattan furniture, hang it on walls as tapestries, or use it as tablecloths or runners. These textiles instantly add warmth, texture, and a sense of history to your space but if you want to take it to the next level then you will want to know how to use Tapa cloth to create your perfect Polynesian hideaway.

You will need to start by selecting the right piece of Tapa Cloth for the type for your project. You can upholster cushions or pillows, craft lampshades, or even use Tapa cloth as a wall covering. These personalized touches add character and charm to your Tiki Bar while incorporating elements of Polynesian culture.

Each piece of Tapa cloth is made to scale, designs usually follow a measurement such as feet and each section is designed with this scale in mind. At the edge of each piece of Tapa cloth the scale is usually drawn out and whilst it is not necessarily a part of the pattern it can be incorporated into your framing of the tapa cloth or cut off to be used in another way. The scale is quite often a plainer colour with little marking, and this can make create lampshades that show us the texture of the cloth without being to dark from the design itself.

Being hand made from tree bark Tapa cloth can have an uneven appearance with some natural knots, holes or frays visible, this is part of the authentic nature of this cloth but is something you may have to work around depending on the project.

The hand painted designs can sometimes also be very thick so each piece really is unique and this needs to be considered when using Tapa cloth.

We sell both pieces or Tapa cloth and larger designs that can be bought by the Square foot so there is a range of designs and sizes to choose from that will suit all budgets.

Once you have chosen your design then you can set to crafting your project. Tapa cloth is a layered cloth that can be sewn to make cushions, upholstery and even clothes. Smaller off cuts ae perfect for framing or making cushions and table matts and we even save the scraps for making jewellery and decorative accessories.

One very impactful way of using tapa cloth is as a wall covering to create a feature wall. Tapa cloth can be used in the same way as wallpaper. If you think you may wish to preserve your tapa cloth for future use elsewhere then we would recommend adhering the tapa cloth to a board, something like a 6mm piece of ply that can be screwed to the wall and therefore removed at a later date. The edges can then be wrapped around the board to create a neat finish but if you prefer to adhere it to the wall then you will need to use a bonding adhesive that you can pour into a roller tray and apply to the wall and to the back side of the tapa cloth. To tidy up any edges we would recommend using a split piece of bamboo or Carved wooden trim like a picture or dado rail.

Vintage Tongan Tapa Cloth requires delicate handling to preserve its integrity. So avoid direct sunlight and excessive moisture, as these can cause fading and deterioration.

Incorporating vintage Tongan Tapa Cloth into your Tiki Bar not only enhances its aesthetic appeal but also pays homage to the rich cultural heritage of the Pacific Islands. By thoughtfully integrating these authentic elements, you can create an immersive tropical experience that transports your guests to a bygone era of Polynesian charm and hospitality. Cheers to embracing the spirit of aloha in every detail of your Tiki Bar!

Posted on

Creating a Nautical Tiki Bar: Your Step by Step Guide

Are you dreaming of an idyllic escape without leaving your back yard? A nautical-themed tiki bar might be just what you need to embark on a maritime adventure right at home. Whether you´re a landlubber or a seasoned sailor, creating your own nautical tiki bar is easier than you might think. In this guide, we’ll guide you through the steps to create a nautical Tiki bar that brings the beach to your backyard.

Nautical interiors shot

Step 1: Choose the Right Location Selecting the right spot of your tiki bar is essential. Opt for a spot in your home or back yard that is out of the way, a corner or a room or garden would make an ideal place.

Step 2: To build your nautical tiki bar you need a sturdy structure. You can repurpose an old bar cart, use a wooden table, or even construct a bar from scratch. Make sure your bar is large enough to accommodate your guests and provide ample space for serving drinks and snacks.

Step 3: Create your Nautical Colour Palette The colours you choose are essential for creating a nautical atmosphere. Classic colours such as blue, red and green should be the foundation of your colour scheme.

This is an image of Decorative Nautical Flags


Step 4: Nautical Décor Essentials To achieve the perfect nautical tiki vibe, adorn your tiki bar with some of the following decorations:

  • Rope Accents & Anchor Motifs: Rope pendant lights, Fish Floats and Rope lamp bases create a coastal vibe.
  • Maritime Flags: Incorporate flags with nautical symbols to evoke a seafaring atmosphere.
  • Coloured Lighting: An instant way to create an atmosphere is with Glass Fish Float lights, if you don’t have many power points then opt for LED battery operated lights or use tea light holders shaped like sea creatures on the bar top.
  • Brass Accents: Brass bar accessories help add an element of luxuary

This image is a of a selection of nautical Tiki Bar decoration. It includes a Ceramic tea light holder shaped like a starfish, a decorative fishing net, a drift wood turtle and battery operated fish float lights

Step 5: Seating and Comfort Choose comfortable seating, weather-resistant if your tiki bar is outside. Nautical-themed outdoor cushions with anchor or seashell patterns can add a nice touch whilst keeping guests relaxed.

Brass Bar acessories

Step 6: Tiki Bar Accessories To complete the look pay close attention to your glass wear, add some Barrel tiki mugs or some fun glasses with anchor motifs or skull and cross bones to serve up signature cocktails. Classics like Mai Tais, Pina Coladas can be written up on a chalk board on the wall. Be sure to include some non-alcoholic options for the designated captains!

This image shows a selection of Nautical Tiki Cocktail Glasses


Creating your own nautical-themed tiki bar is a fantastic way to embark on a voyage of relaxation and fun right in your own hut or back yard. So, hoist the anchor, set your course, and raise a glass…or two!

Posted on

Meet the Makers

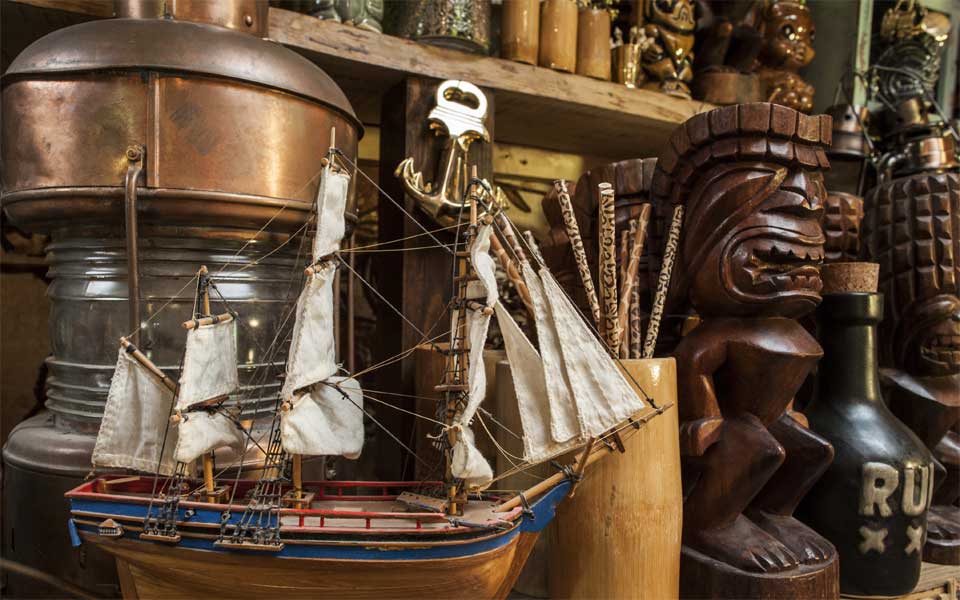
Ever wondered how we make our Tiki Mugs? We thought we would take you on a little tour of our Pottery here in the UK to show you just that, so step this way….

The Britiki mug was one of our first Tiki mugs that we also ran as a limited edition, you can see me painting them here…

UK Tiki mugs makers are a rare breed, lots of producers are found in America but on British soil, there are very few and we seem to be the only manufacturers producing on a larger scale.

We began producing Tiki mugs in the UK back in 2004 with our Britiki. Having become well known for carving Tiki’s we were asked if we could design and make a Tiki mug. We scoured the UK to find a mug maker but failed in finding anyone that fit with our requirements, so we bought some books, scoured eBay for a second-hand kiln and rolled up our sleeves. This started a long journey as our knowledge of ceramics production grew and we are still learning today!

Slip Casting

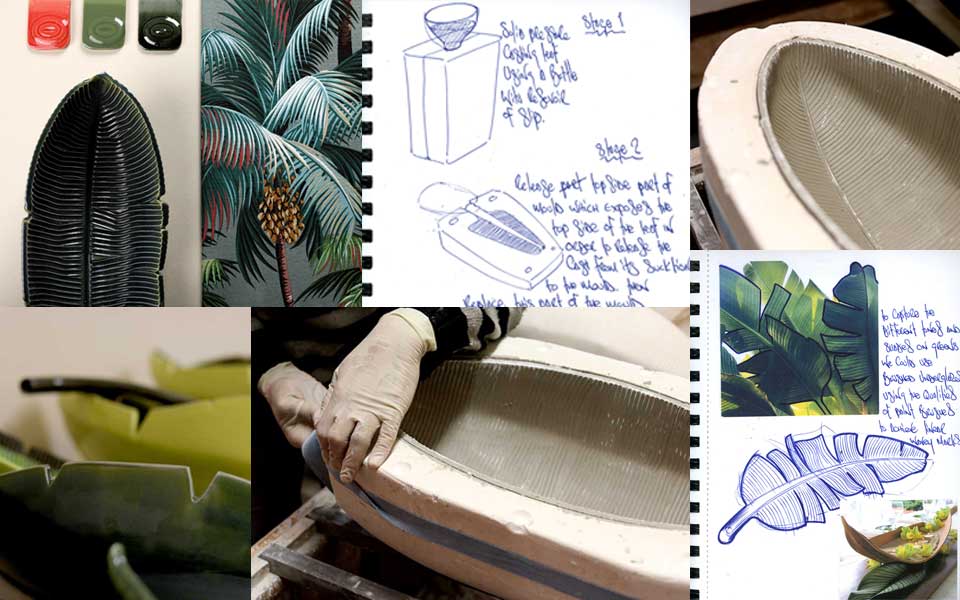
We use a process called slip casting which in simple terms is where a mould is created that liquid clay is poured into, this process leaves you with a ready formed cup shape as opposed to building a shape on a wheel.

To make our very own designs that are unique to us we start by sculpting the design, this is usually done in clay form but can also be done in plaster. This is an important process to get right because if the detail is too soft during the process of moulding you lose the detail in the final piece so the sculpt is usually exaggerated to allow for the softening of the detail in the mould process.

This is our new ‘Little Grass Shack’ Tiki Mug in the making…

Mould Making

The moulding process is something we now outsource but this involves a process of creating a mould that shows the mug in reverse. The moulds are made in pieces using 3 or 4 and they are made in plaster as plaster draws out the moisture in the liquid clay which leaves a skin. Each mould is usually only poured once a day, so we have multiples made to be able to produce more volume daily. Once we have the moulds, we can walk you through the process. This starts in the morning when a test pour must be completed to ensure the consistency is correct for the days pour.


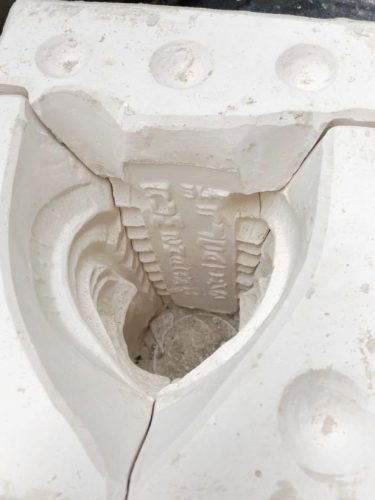
We also make custom mugs for brands like this one shown here that is the mould for Peter at The Floating Rum Shack.

Pouring

Our Tiki mugs are all made using British clay extracted raw from the earth in Stoke on Trent which is mixed in what is known as a Blunger with a recipe of silica and water produce our liquid clay. Once this has been confirmed then we commence pouring which must be done in one continuous period of time, no time for tea at this stage! Each mould is filled with the liquid clay and because the moulds are plaster, they begin to soak up the water in the clay, this process forms a skin on the outer edge of the mould, a process that can take a little less than an hour, the liquid clay left is poured out to reveal the skin.

This is our Flamingo Sharer drying

The mould is then left to dry further before the moulds can be undone. At this stage, you can see why the mould must be in parts so you can remove one part at a time taking care to ensure the soft skin is not misshapen in the process. When release from the mould, you can see the mug for the first time in its ‘greenware’ state.

This is our single Flamingo mug fresh out of the mould

Seaming & Fettling

The next process is called seaming where are of the seams on the mug are removed before allowing the piece to dry further overnight. Once dry each piece is then fettled, this is where any seams are smoothed using water and a sponge and if any of the seams fall across the detail then the detail is carefully restored.

Once fettled this is the first time the piece will be fired. This first firing takes 12 hours and reaches a temperate of 1000degrees and leaves us with a piece that is called the bisque. A mug in bisque form is then ready to be hand-painted and glazed.

The kiln ready for a bisque firing…

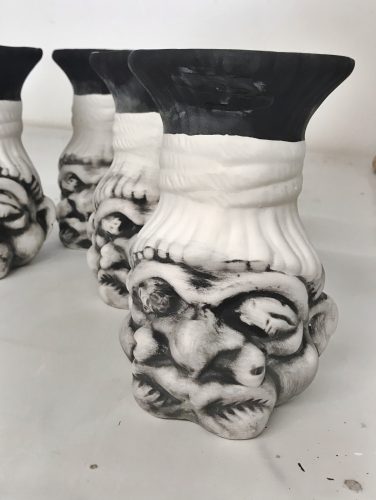
Hand Painting & Glazing

We have a variety of processes to decorate a piece, the first is a solid glaze so for pieces that are one colour. We then have a variety of tiki mugs that we paint with underglaze first and the rub off to create texture and detail within the design. Some pieces are hand-painted with underglaze they are then fired again before having wax resist added and their final coating of glaze, this can help us to create both detail in the piece and in the feel. A great example of this being our Shrunken Head Tiki mug where the bone through his nose has been painted with wax resist, which resists the glaze when the piece is dipped leaving the bone as raw bisque and feeling rough, just like a bone would!

Our Shrunken Head mug goes through 3 firings and has wax resist added to keep the bone unglazed

Limited Edition Special Effects 

Then for the special limited-edition pieces, we can add an extra firing, you can see our new limited-edition ‘Captain’ who is first hand-painted with underglaze, then glazed in a glossy brown final glaze before having an on glaze transfer added to his hat that is fired on to the piece. The final details are then added with his gold buttons and edition numbers hand painted before his final firing! But that is why we call them limited editions, right?

Our new Limited Edition ‘The Captain’ being hand finished

The whole making process excluding the actual making of the mould can take up to one week in total so having multiple moulds is important to be able to make enough to fill the kiln each time and to fill lots of end-users with rum!!!

Fun Facts

  • We can make up to 2500 units per month in our current production facility.
  • The final kiln firing fires the piece to over 1100 degrees
  • Just one kiln is firing product for 3120 hours per year and we have two
  • We use 25 tonnes of clay per year
  • We ship more than half of the Tiki mugs we make here in the UK to America and beyond, our mugs are even shipped to Hawaii!
Posted on

Tiki Bar. Create It. Build It. Thatch It.

Artificial Orchid Stem with polynesian carving and tropical palm leaf thatch

Ever wanted to build your own Tiki Bar or just give your shed a makeover then look no further. This is the first in our series of new blog posts where we will explore the difference in the wide variety of Grass Thatch Roofing that we stock and how best to plan your very own makeover or tropical Tiki Bar.

If you are in the initial planning stages then you are in the right place, we would always recommend that you start with the shape of the structure you want to build and when it comes to size, use the size of the roofing material that suits your needs to help plan the size of your roof. This way you will not be retrofitting the Grass Thatch Roof to your structure which means less waste,  leftover materials and ultimately less cost, which can then be spent on the interior.

The type of structure you are covering or building can also be accommodated the Rain Cape Thatch, for instance, is very easy to use with no level of skills required to fit this to any existing structure but something like the Cogan grass Thatch is best layered and will require some skill to layer and secure to your roof but that is why we are here to help.

Rain Cape Thatch Roofing – Available in 3 Different Sizes

Medium Rain Cape Thatch

Rain Cape Thatch Roofing Medium £35


The first in our series is the Rain Cape Thatch also know as ‘Mexican Rain Cape’. Handmade from sustainable Mexican palm leaves, this thatch roofing has a shaggy exterior which is woven at the back in a diamond-patterned. This detail makes it great for use on an open framework as the underside is just as nice to look at.

Rain Cape Woven Back Detail and Thatch Front

Rain Cape Woven Detail Back and Thatch Front

It is soft and flexible making it easy to place and wrap or fold if you need to. It comes in a range of sizes that can be nailed, stapled or tied into place in single or double-layers if you want a fuller appearance or your roof is larger than the size of the rain cape.

Extra Large Rain Cape Thatch Roofing

Rain Cape Thatch Extra Large – £130

Each piece comes with a roped woven top that can be folded over and hidden at the apex of your roof but another nice finishing detail is to use a split bamboo pole to cap the top of the thatch and help keep it in place.

Woven Top to Rain Cape Thatch

Split Bamboo Pole for a Roof Apex

Woven Top and Split Bamboo Pole

People always ask how long they should expect the Rain Cape to Last and that is always a difficult question, in more Northern climates where the weather is wetter there will be a degree of degradation but we generally only hear from people topping up or replacing parts of their roof after more 1-2 years of installation. That being said, the wind will ravage your roof if not secured well that is if the birds don’t see it as bedding, the Rain Cape Thatch is the least favourited by birds but there are of course tips for the grass roofing that can be used to deter our feathered friends.

So overall you should get a good lifespan out of your product and only ever need to replace parts or top up on your existing thatch.

Medium Rain Cape Thatch Roofing

Rain Cape Thatch Large – £45

Another frequently asked question is if the Rain Cape or Grass Thatch Roofing is waterproof, the simple answer is that no amount of thatch will keep out the worst of the rain but if you are clever about the structure you are applying the thatch to then you can ensure you and your guests can sit out any storms, especially with a Mai Tai or two!

Coconut Cocktail Cup

Escape. Create. Live Aloha.
Posted on

Get a hint of the tropical interiors trend…

Tropical Ceramic Leaf Slip Casting Process Pictures

Want to add a hint of the tropical interiors trend in your hut? Take a look at our new tropical leaf range and add a slice of Aloha to even the most minimal interior. Here in the mud hut we have been looking ‘mauka’ to Mount Waiʻaleʻale and its rain forest for inspiration. On these towering slopes grow the humble banana (Mai’a), the focus and beginning of our new botanical ceramics range.

Polynesian and Hawaiian legend tells many stories of the Mai’a. It was known as one of the ‘canoe plants’ that the Polynesians took when exploring vast stretches of the pacific ocean in search of new islands, Hawaiian legend tells of Mai’a being kinolau, the body form, of Kanaloa, the Hawaiian god of healing. But the use of Mai’a leaves in food preparation and cooking was the perfect inspiration for our new table top range.

Committing pen to paper we have explored the intricate details that form these beautiful tropical leaves and created a new mould for slip casting using ingenious methods to create the veins that are synonymous with these leaves.

Slip casting is a process we follow in our London workshops where clay is mixed with water, poured into a plaster mould and allowed to form a layer on the inside walls of the mould. Once the water is absorbed the rest of the liquid clay is removed and the cast piece is set free from the mould. It can then be fettled (trimmed) and any detail lost in the casting process is added back in before the piece is fired at temperatures above 1000 degrees where it can then be glazed to a finished piece. We hand make around 3000 ceramic Tiki mugs every month in this way.

Gifting plants for times of scarcity is also the Hawai’i way, so perhaps this could just make the perfect gift too, head on over to ‘New In’ to get yours.

Posted on

The Captain

Nautical Interiors Shot

Aloha! It seems fitting that this opening post on our revamped website should be about the legendary 18th Century British naval explorer, Captain James Cook. After all, it’s arguable that the enduring fascination of Westerners with the islands of the South Pacific began the moment that Cook’s written accounts of the customs of the native Tahitians first hit the literary and scientific salons of London.

Cook may not have been the first westerner to visit Tahiti, but he and the crew of his ship, The Endeavour, were the first to stick around long enough to witness the ‘extraordinary and barbarous’ spectacle of a ritual human sacrifice – something which may have seriously undermined romanticised perceptions of Polynesia at the time as an earthly paradise populated by good natured ‘noble savages’ living in harmony with the natural world.

But though Cook may have followed a trail blazed by others with regard to Tahiti, in his desire as a seafarer to ‘not only go farther than man had gone before, but to go as far as it was possible to go,’ he can lay claim to having been the first Haole (pale-skinned European) to make formal contact with the peoples of the Hawaiian archipelegio. This, on his third and what was fatefully to be his last, Pacific expedition. Although he and the crew of his ship, Discovery, had visited the nearby island of Kauai the year before, Cook’s decision to drop anchor in Kaelakekua Bay, Hawaii island, in 1779 caused quite a stir.

Having inadvertently landed during the middle of a Makahiki, or harvest festival, in which the islanders were expressing gratitude to the Polynesian god Lono, Cook was initially mistaken for a flesh and blood incarnation of the god. However, the locals’ awed reception of both captain and crew was to last barely a month. With the death of one of Cook’s company suggesting to the natives that their guests were somewhat less divine than had previously been assumed, tolerance of their overseas visitors began to wear thin. Relations spiralled into mutual distrust and eventually violence, culminating in the brutal slaying of Cook on the shoreline of the bay!